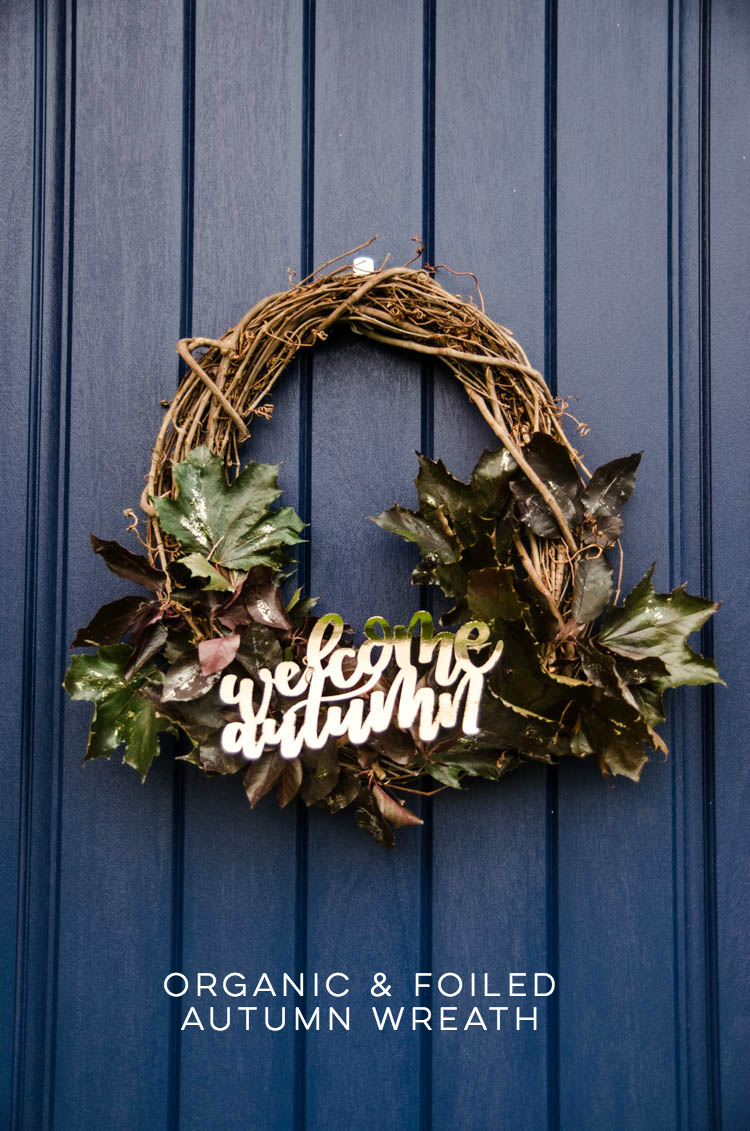
This DIY autumn wreath is organic and full of gold foil. The free hand lettered ‘welcome autumn’ design is the centre, surrounded by foraged leaves.
Pumpkin spice lattes are officially here… so of course the fall decor has to follow ;)
Today I’m excited to be teaming up with some other rad bloggers to share fall wreaths! The wreaths that some of these ladies came up with are freaking amazing. You can find them all linked at the bottom of this post. Mine is rather simple- just the way I like it!

I started out with natural elements- a grapevine wreath and autumn foliage, but then added some shine with rose gold and gold foils… and hand lettering of course ;) And you know that I have that ‘welcome autumn’ lettering available as a free download for you so you can make your own!
Ready for the DIY how-to?
For this autumn wreath, you’ll need:
Affiliate links used for your convenience- find my full policies here
- Grapevine Wreath (mine is an 18″ oval)
- Autumn foliage (foraged) & Branch cutters
- Wire to affix to wreath (optional)
- Clear spray sealer
- Gold and Rose Gold DecoFoils
- DecoFoil Spray Adhesive
- Iron
- Mixed media adhesive & Paint brush
- Card stock with lettering cut out (I used my Cricut Maker)
The first thing you’ll want to do is cut out the lettering, right? Go ahead and grab my hand lettered file by entering your email address below or use any fonts you like.
If you haven’t ever cut uploaded your own file to cut it out using a Cricut, I share a screen shot, step by step in this post.

Once it’s cut out, you’ll want to give it a protective coating if it will be outside. I gave mine two thick coats on each side of the clear spray sealant. Then, when it’s dry you can foil it up! I used a fusible spray adhesive and rose gold Deco Foil (apply with an iron) for the lettering. I LOVE how smooth of a foil look this gives compared to hand brushing on adhesive.
Now that you’ve got your shiny lettering all ready, it’s time to assemble the wreath! You’ll notice that the pictures don’t TOTALLY match up with the process I’m going to share with you. Do as I say, not as I do, okay? Haha, I definitely learned on this one and perfected the process for next time!


I started by sealing my leaves to help them last longer BUT I’m going to go ahead and tell you to do that LAST. Instead, foil your leaves first! Then seal afterwards. To add foil flecks to your leaves, brush on a mixed media adhesive sparingly. Let it dry clear (but still tacky) before pressing on your gold foil.

When they’re all foiled up, give them a good spray on both sides with your clear sealant. This will help them last longer.
Then, go ahead and tuck them into your grapevine wreath. I wove my leaves in and didn’t use wire but a floral wire is a really easy way to affix leaves and branches to a grapevine wreath. I used the grapevine coils to hold my lettering in place as well, but a couple dabs of adhesive would have had it attached to the leaves as well!


I’m really in love with this wreath! I like that the leaves are still totally autumnal but they’re not bright yellows and oranges and that the foils dress it up just enough.
Make sure to check out all the other wonderful wreaths in the hop at the blogs linked below!

PMQ for two // The Learner Observer // Amidst the Chaos // Up to Date Interiors // Lemon Thistle // Domicile 37 // The DIY Mommy // Love Create Celebrate // Garden Therapy
 THREE Room Makeovers in the Works
This came out great! I love the little touches of gold!
Thanks so much Jessica!
very cool idea, Colleen! I love the foiling :)
Thanks so much Stephanie! I want to foil everything now!
Thanks so much Stephanie! Foil all the thingS!!!
I really like the gold foil on the leaves! The little word medallion is also adorable.
Thanks Ariel! I want to put foil on everything now ;)
Thanks so much Ariel! I’m addicted to the foil.
So pretty Colleen! I love that you used your foils to get the shine! I’m dying to try them!
*so soon* Can’t wait to see what you do with those foils!
Hopefully they show up for you soon! XO
The gold foil is so pretty on the leaves and a beautiful substitution for traditional Fall colors.
Thanks so much Kathy! I could foil everything, I’m addicted!