This post is sponsored by Home Depot Canada (who I totally love!). Find all my policies here.

Today I’m so darn excited to be sharing our FINISHED Small Garage Workshop with you! This started out as carport (with all the foundation for a garage) and now it’s a totally functional small garage workshop with a wall devoted to yard tools and family storage (kids bikes!). I’m chatting how we finished it (from the DIY epoxy floors to the windows and lighting) and what storage pieces we chose to make it work incredibly hard for a small space.
If you’ve been following along with Lemon Thistle, you might remember that last summer we moved into a new home and dove head first into major renovations (you can see all the before photos right here!). One of the things we were excited to take on as soon as our kitchen was complete was a garage. This is such a life changing project for us and I don’t say that flippantly. This workshop has been such a dream of ours since we started working on DIY’s in our apartment’s parkade with borrowed tools. And then when we built our kitchen table (and a hundred other things!) in our driveway (also with mostly borrowed tools), we decided it was a wishlist item for our next house. But the house we bought only had a carport and no room for a shop let alone a shed in the back yard.

So we were still DIYing in our driveway, storing all our tools behind our fence with a tarp over them. And all of our yard tools were tucked in corners of the yard and all our kids bikes and toys were hanging out in the driveaway and we were the neighbours that nobody wanted to have I’m sure- ha! So we’re so excited to have made over this carport into a totally functional (and beautiful!) workshop for our DIY projects and to get all that STUFF tucked away in proper storage!
Before I get to the after… want to see what it looked like before?

Well… that’s it. Nothing fancy here. The space did have a full foundation (there’s an under slab room downstairs) so it was really just never finished off. We moved the bedroom window to the side of the house and closed it in. If you’re interested in more of that and the plans for this space, you can check that out here. Once that was done… finishing! The fun stuff!


The first thing that we did was finished the drywall. By insulating and finishing the drywall, this garage stays pretty warm which is important to us when we are working in here in the winter time. We also brought in a space heater for those extra cold days.
Then, we finished the floor! You can see some unevenness in these photos and that’s because this concrete was WELL worn and cracked. It was also brushed concrete. We used this epoxy patch kit to patch some of the bigger cracks before using the Epoxy Shield Garage Floor Coating. We did the acid wash before the patching. Since it was brushed concrete, we decided to do the clear epoxy coat on top to really seal it (I can’t find that one online).
We also put two windows into the garage for natural light and to keep the front of the house looking beautiful (well… it will be once we side it! Ha!). We just chose these cellular shades which are pull down and light filtering for privacy without losing light. To keep it bright, we also painted the walls a nice bright white with a warm undertone to keep it from looking too sterile or industrial. The one we chose is called Swan White from Behr. We also added in four LED pot lights to the space because we do most of our work in the evenings while the kids sleep (aka. in the dark!).

The things that we needed to accomplish with this space were:
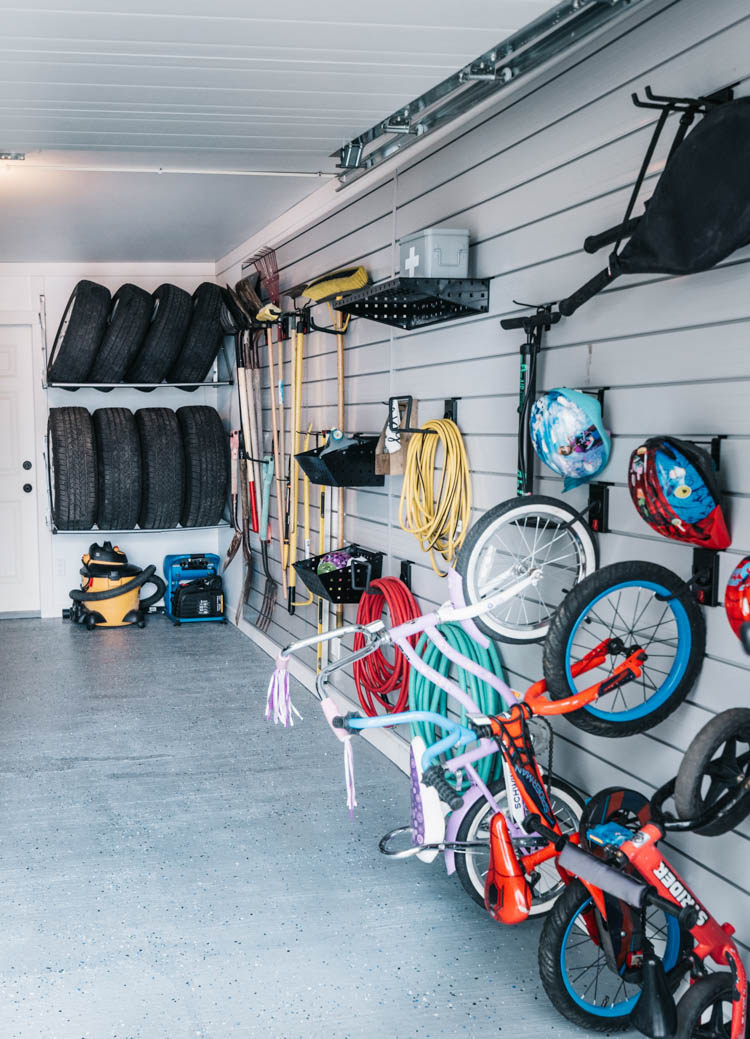
- Store all of our yard tools/ things that were displaced with the lack of a shed (not inside storage things)
- Store our winter/summer tires (x2) when not in use
- Store our kids bikes so they can easily access them
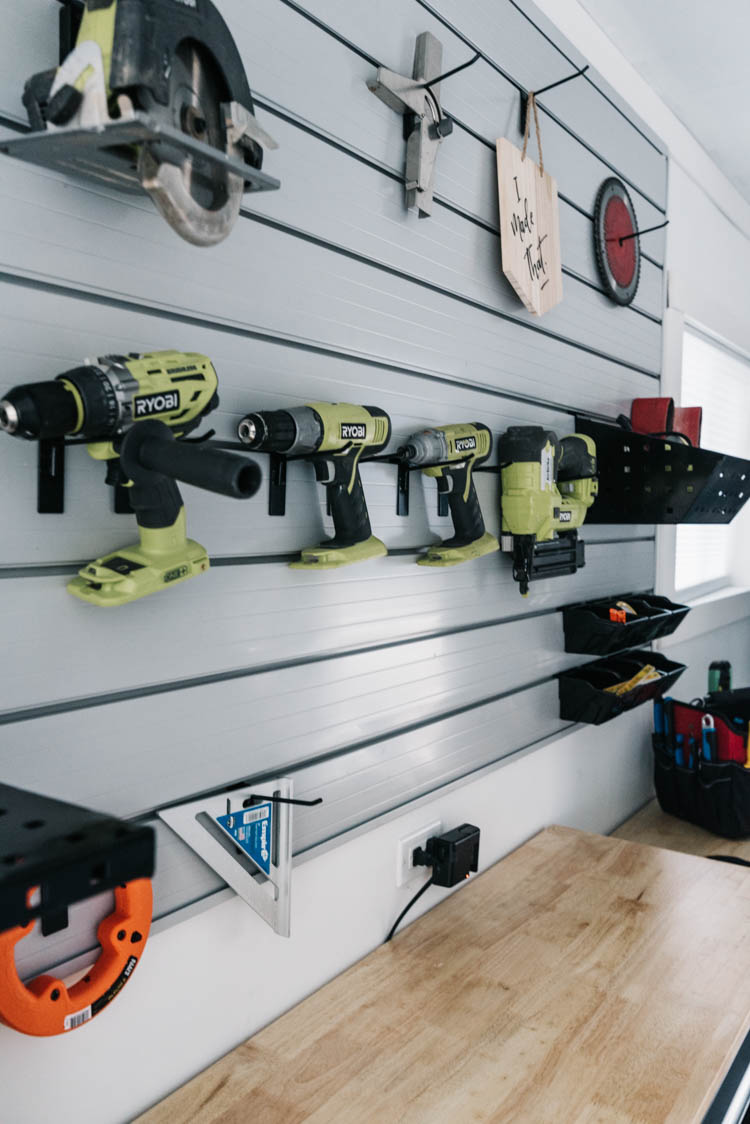
- Store all of our tools
- Have room and set up to easily use our tools (workshop!)
To do that- we basically split the garage straight down the centre. The left hand side is workshop and the right hand side is storage.


The tire racks are amazing for keeping both sets of tires out of the way and off the ground. I love that we can tuck our air compressor and shop vac underneath them without losing more floor space. The slat wall is such a beast, I’m in love with how efficiently it holds ALL THE THINGS. I wrote a whole post about it if you’re interested in learning more about it and how to install it!
On the other side of the room, we have our workshop. I’m thinking of putting together a more detailed post about this sharing the tools that we own now (we’re *almost* at the point where we don’t need to borrow tools… although there’s still some we have to call my dad or Shane’s brother for!) and how we store them/ use them. Is that something you’d be interested in?


We used a slat wall panel here as well that is perfect to store all of our power tools that we use regularly either on hooks or in baskets. I also love that our saw blades can be up high where kids can’t reach them. Other than the slat wall, we have a beautiful Husky work bench that is the dream piece of this whole space. It has a solid wood top to make it really durable but also has a ton of storage in drawers to make hand tools really easy to find and put away and ORGANIZE. Which is Shane’s favourite part.


Beside the work bench, we have two Husky storage cabinets with the same wood top so we can roll them out and use them for project work surface as well. The tall cabinet on the end stores all the tools that come in individual carrying cases that we don’t use all too often (like our Dremel, Paint Sprayer, Scroll Saw, Kreg Jig and Heat Gun).


In that post I’d also share… how the kids love to help! One of my favourite things in this space was a total last minute addition. We’d got this folding workbench and my intention was to use it as a holding station for projects while they dry before they can get put up in the house or where I would paint since metal is so easy to clean compared to wood. but when the kids saw it, they asked if it was theirs and well… that idea was way sweeter. We can still totally use it when we need that extra surface, but when we don’t- it’s their workbench and that makes for some happy kids. Emmitt especially LOVES to build right beside us. He uses all the scrap wood to make creations and asks for help screwing pieces together. This can be his special spot to do just that and I can’t wait for him to start using it!
That decal is just made with my Cricut and regular adhesive vinyl so if and when we want to take it off, it’s easily removable without damaging the wall.


In front of that work bench, we store our saws when they’re not in use. They tuck away really nicely right here and the miter saw stand tucks away beside the tall storage cabinet. This leaves the floor space clear. When we want to use the saws, we pull them out and set them up in the open space.

Oh! Shane made me promise that I’d share this tool bag. He bought this months ago and it’s his favourite purchase this year. He uses it to carry all the tools he needs from the garage (or before this was finished, from the basement) to wherever the job is in the house. It saves a bunch of trips!
*whew!* That is a long post, but ohmygoodness I’m really excited about this space. We’ve only had it finished about a month but it’s already been such a game changer to the way we work. I love not having to haul the saw out and clear the snow to set it up… can we just all agree that even this alone is amazing?! Ha! I’m going to sign off for now because we are going to get working on a statement wall for our Master Bedroom (you can see what we have planned HERE!) and put this workshop to use!

 Black + Textured Modern Master Bedroom Design Plans
Your blog arrives in my email in small font with the sentences all running together. Has anyone else mentioned this? Maybe you could send it to yourself to see if it arrives that way. No other blog I subscribe to is like this.
Thanks for letting me know Cheryl! I have been emailing with them to try and figure it out. It doesn’t come to me that way but have a couple screen shots from other readers :)
You guys are slaying it in this house!! Love the practicality of everything you did in the garage!
Thank you so much Karisa! We are so loving checking off the spaces!
Maybe I missed it, but what brand slat wall did you use?
Hi! The brand is Husky. You can read more about the install here: https://www.lemonthistle.com/slat-wall-storage-tips/