Sharing the crafts and decor the kids and I decked the playhouse in this year! Come take a tour of the tiny but mighty modern Christmas playhouse!

Since we built this playhouse at the end of the summer, our kids have been using it as a hideout, a clubhouse, a home base and who knows what else as we spend more time at home. They love spending time in there and that hasn’t changed with the cooler weather.
So when I was sorting through our holiday decorations deciding which decorations should head to the thrift store this year, I realized I could use most of those for the playhouse! These garlands may not be fancy by today’s standard (12 years ago when I bought them, I thought they looked SO realistic!), they are certainly beautifully suited for this kids space! Between those, some stolen ornaments from inside our house (she begged to bring the nutcracker out here, I couldn’t say no!) and a little bit of crafting with my girl, we spent no money on this space but it’s incredibly festive for them!

Today I’m sharing a tour of this modern Christmas playhouse as part of a Kid Christmas Tour with so many amazing bloggers. I’ll link all of them at the bottom, but if you’re here on the tour from Stacie’s Spaces, welcome to Lemon Thistle!

We built this playhouse this summer and then the kids and I took a week to decorate it together. They ran the power tools and sewing machine with me and they chose the paint colours and even painted them on. So when it came to decorating for Christmas, I knew I wanted their help again- it’s their space after all!
My daughter jumped at the opportunity so we dragged this all out there and she made every decision. Garland on the railing or around the door? A bow on the wreath or wrap the ribbon around? She made great decisions, if you’re asking me :) As a sidenote, this is one of my favourite tips about designing anything with kids- give them two great choices to decide between. I share more tips here if you’re interested! I love to let my kids help and am always so impressed at the design elements they’re already picking up on.


Here’s a photo before we added the christmas lights (a bit grainy because it gets so dark so early!) and just for honesty, here’s one after (the rest of the photos in this post, like this one are taken the next day once lights were up)… there be cords everywhere. But the kids are so happy to have their red and green lights. And I’m happy they’re on the playhouse and I still have white lights on my real house! I was really hoping for snow for this photo shoot but the weather just didn’t cooperate. We’ve had snow since October but of course it all melted this week!


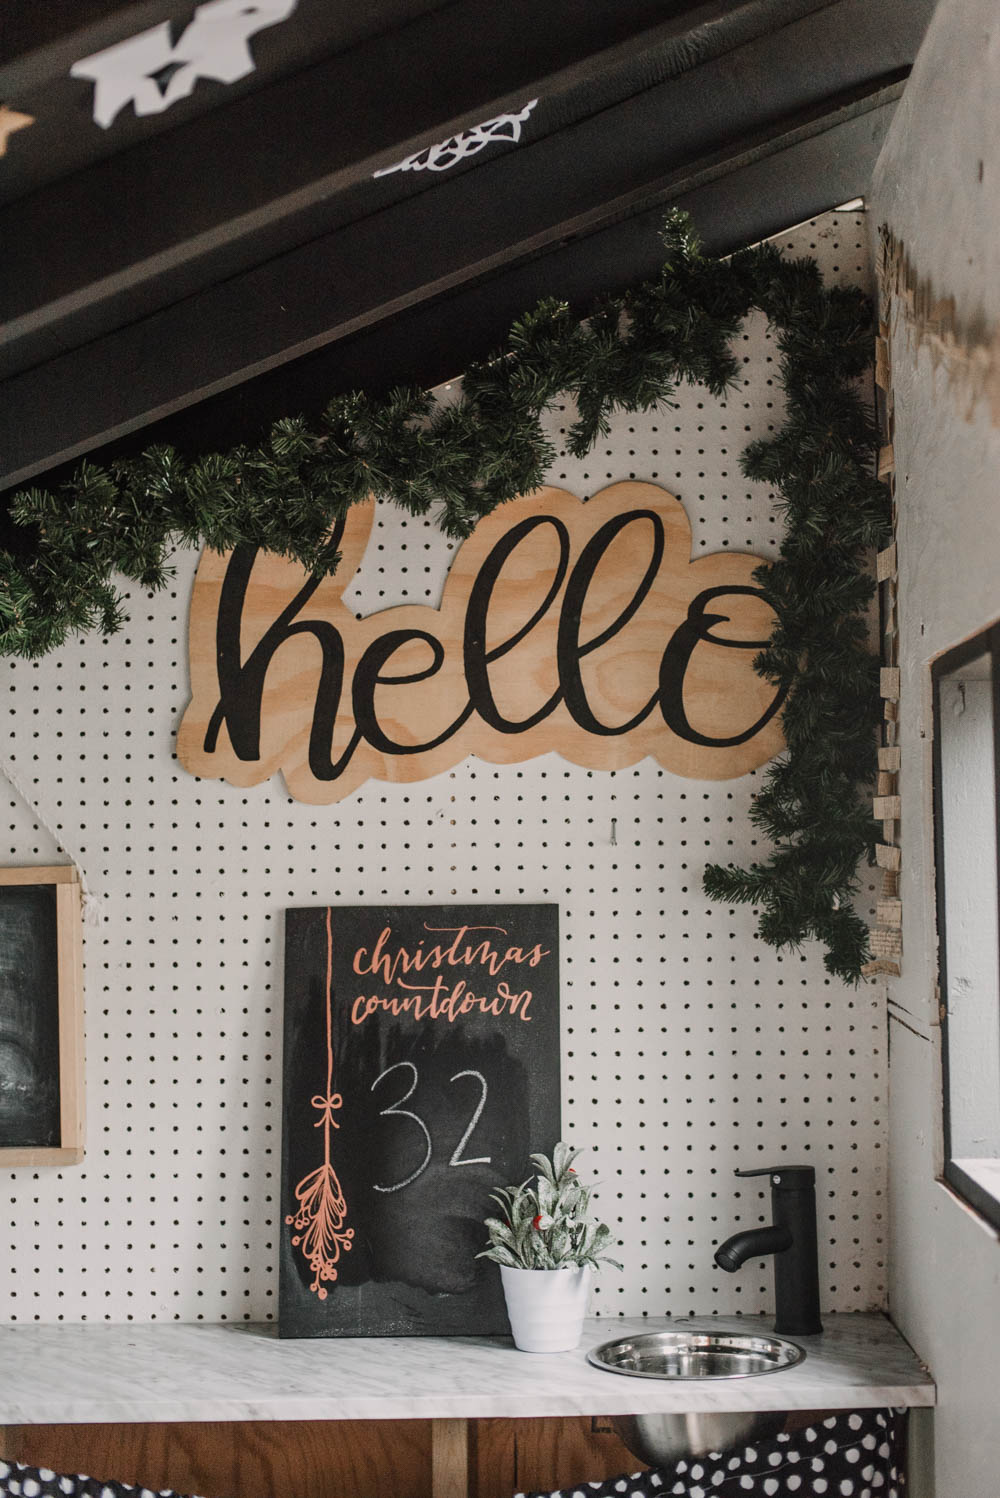
On the inside, we added another garland (they’re different shades of greens so we wanted to separate them) and her favourite nut cracker. We changed the chalkboards up (those are both DIYs, see the hanging one here and the countdown here).


She also cut out all the felt letters to hang on the stockings out of some leftover felt I had in my craft room (from cutting other felt letters!). She chose red over green because we already had green cabinets so the red ‘popped’. She’s my mini, you guys. We just pinned the letters on with safety pins on the inside. These stockings I actually LOVE but we bought them back when we only had 2 kids and could never find more. We upgraded to matching ones last year so these have been in the bin waiting for a new home.


The little Christmas tree is one we’ve had for years. It was in the twins bedroom at our last house but last year the kids convinced us they needed bigger trees with real lights for their bedrooms. They won, you can see the girls’ room here and the boys’ here.
Aubrey wanted to use the jingle bells (I have hundreds, I honestly don’t know when from) so she threaded them onto embroidery thread and I tied them off for her. We also used the scraps of felt from the letters to cut out stars and threaded those too. I love how simple but festive it is!


We added snowflakes allll over the place in here too. They’re one of my favourite winter crafts to do with the kids. We fill almost every window in our house over the winter, but these ones were first this year. Even when the twins were too little to use scissors, I’d cut them and let them tape them to the windows. It’s a bit of winter magic. The kids love that they can see the snowflake covered window from our living room along with their very own christmas lights.


Alright, I’m going to leave it at that! If you’d like more details on the playhouse build, I share that here and then I share all the details on the interior decorating/DIY in this post here!
I know you’re going to so enjoy checking out all of the other spaces in this tour, so I’ve linked them down below for you. If you’re taking the tour in order, your next stop is Design Improvised!
MONDAY
Two Twenty One // Love and Renovations // Lemon Thistle // Stacie’s Spaces
The Organized Mama // Design Improvised // Inspiration for Moms // Bright Green Door
TUESDAY
Making Home Base // T. Moore Home // Casa Watkins // Up to Date Interiors
Living Letter Home // Home on Poplar Creek // DIY Decor Mom // Kate Decorates // The Goat Abode

 6 DIY Wood Slice Ornaments
So you pulled me in with that black playhouse. Now I’m hooked because the holiday decor inside is adorable. Love it all!
How fun that the kids have their own playhouse! I love all the Christmas-y details.