Sharing a free holiday card design to make your own christmas photo card… plus a tutorial to make it YOURS with your family photo!

Can you believe it’s time for holiday cards!? I know, time flies when you’re having fun. I had so much fun partnering with Modify Ink to create a holiday card design last year, but I know that the price point wasn’t for all of you. This year I wanted to create a holiday card design that I could share with you for no cost at all. Then you can get them printed wherever you like! I have a couple suggestions, but the design will really work anywhere.
I had fun hand lettering this one and the snow overlay is such a sweet touch. I actually love these so I’ve gone ahead and ordered them for my family (so if you’re on my list, you know what to expect!). And if you’re wondering, I wouldn’t’ be upset if you copied me… that’s the point, I would be flattered to receive your card using this design. ;)

I’ve made both the holiday card design for the front and a simple one for the reverse. The reverse I’ve got two options- with the greeting I designed, or blank with just the snow for you to add your own greeting. Since the overlay can be a bit tricky if you’ve never designed anything, I thought I’d give a quick tutorial on how to add your own image in to get the same look (with the snow overlay) without getting the snow on all your pretty faces! I did this using a free online software so you don’t need photoshop to make your cards.
Start by downloading the card designs. Enter your email below and .zip file with all three designs will be sent to your email. Unzip it by double clicking the folder.
Reminder, all freebies (like this one!) on Lemon Thistle are for personal use only. That means make them for you and a friend, but you can’t redistribute my files or use my designs for personal gain/profit.
Ready for the tutorial? I’ve included screen caps of each step. If it’s too small for you to see, just click it to be taken to the full size image.

When you have your files downloaded and have your photo chosen, go to PicMonkey(.com) and select ‘Design’. Resize that baby to the size of your cards. Mine are sized as shown to be printed as postcards with VistaPrint.
I’ve printed almost every announcement, holiday card, and invitation with VistaPrint- I choose the postcards. They’re really affordable for the quality and I love the matte option. I always add on envelopes too (you need to select that, just so you know!). You could also get them printed (one sided, of course) as photos from any photo centre.


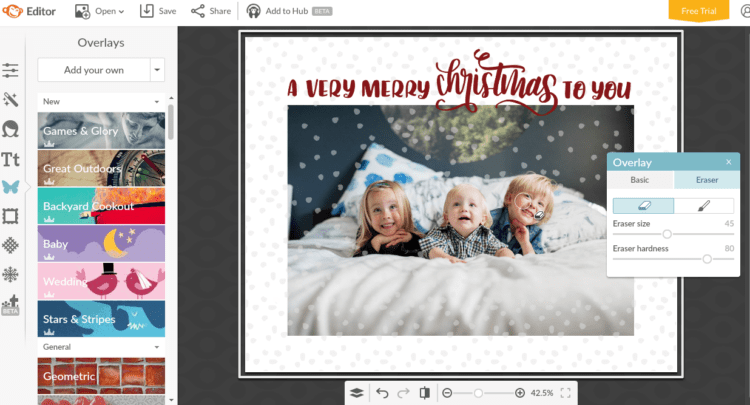
When it’s the right size, go to overlays (the butterfly) and ‘add your own’. Choose your photo and the front of card design. Resize the overlay to fit the canvas, then slide it to the side (still centred vertically) to adjust the size of your photo.

Line your photo up centred horizontally and just underneath the sans serif letters as shown. Then, slide your overlay back into place.


Notice all that snow on your faces? Dang snow, right?! It’s easy to fix. While your overlay is selected, see that overlay panel (the color changer) and the tab that says ‘Eraser’? Pick it, then size up your eraser to the size of a snow dot. Erase the ones you don’t wan’t there, then save your card (use file size Sean).

Boom! Holiday card design DONE.
The reverse follows the same process, just drop the design (either with text or without) into your canvas, add your names and hit save. SO simple.
P
If you do use this design I would LOVE love to see a photo of your card! Email colleen@lemonthistle.com or tag me on social @colleenpastoor. Happy designing!

 Joy to the World! DIY Foiled Hoop Holiday Decor
Love, love, love this idea for cards. Thank you so much for sharing, and can’t wait to get the files so I can start practicing for next year’s cards.
Thanks Gay! Enjoy!
Hi! Could you tell me the name of the font that CHRISTMAS is in and where to buy it?
Hello! That’s actually my hand lettering :)