
If you’re a DIY’er, I’m sure you can relate- you bought this perfect material (wood/ fabric/ paint- whatever) and had the best intentions to do something amazing with it. Then a few weeks/months/years went by and your inspiration for it was completely gone. That was me with this fabric. I ordered it up from Ikea before my kids were born. I had just bought a second hand jumbo playard for the twins and thought I’d make a fitted sheet for it. But then it showed up and it was really thick material- not great sheet material. I knew that I still wanted to do something with it, but I couldn’t decide what. My kids are 18 months in March- if you do the math, that material has been sitting for a loooong time. Read on to see all the step by step instructions for this easy to make stuffed animal storage pouf.

I spotted an idea on Pinterest ages ago to stuff a regular old bean bag chair with stuffed animals to hide them away and didn’t think much of it. Until now. Yesterday I had a flash of inspiration and decided I needed to make a square pouff- and I’d fill it with all my kiddos’ stuffed animals… a stuffed animal storage pouff if you will. I’m so happy with how it turned out! It doesn’t quite have a home yet- it’s hanging in our living room. But it will make it’s way into the playroom once we finish the renovations on that room. My kids totally love it, I set it next to our book crate and they promptly popped down (I didn’t even have to direct them to it) to read with each other. And when I showed my daughter that there was a zipper (her new favourite thing to play with), before I knew it she was inside the pouff, pulling out her favourite bears and bunnies for her and Emmitt. I’m calling this one a success!

Here’s what you’ll need to make your own:
- Fabric (yardage will depend on how large you would like your stuffed animal storage pouf – see my notes below on how much I used)
- Fabric Scissors
- Sewing Machine with coordinating thread (& Zipper foot if you have)
- Zipper (slightly smaller than your stuffed animal storage pouf is wide)
- Iron
- Lots of Pins


I made my pouff really large. My kiddos share everything, and the space I’m making it for needed something big. Mine is 30″ x 30″ x 15″. I used 25 square feet of my fabric. My fabric was 5 feet wide, so I used 5 feet of the material. You could really make it any size you like- so it’s up to you! Start by cutting your top and bottom squares in the size you would like. To get a perfect square, fold the material as shown in the photo and cut. Measure how tall you would like your pouff (the sides), and cut those out of the same width material as the top and bottom (shown).
Now your pieces are all cut! It’s time to start assembling. I started with the zipper edge because zippers stress me out. BUT I found this tutorial from Corey at Tiny Sidekick on how to sew a zipper (for the total beginner) and now I’m not afraid of them anymore! It’s amazing- so that’s the method I’m using for this tutorial… and I want to put zippers in everything, I feel like a new woman!
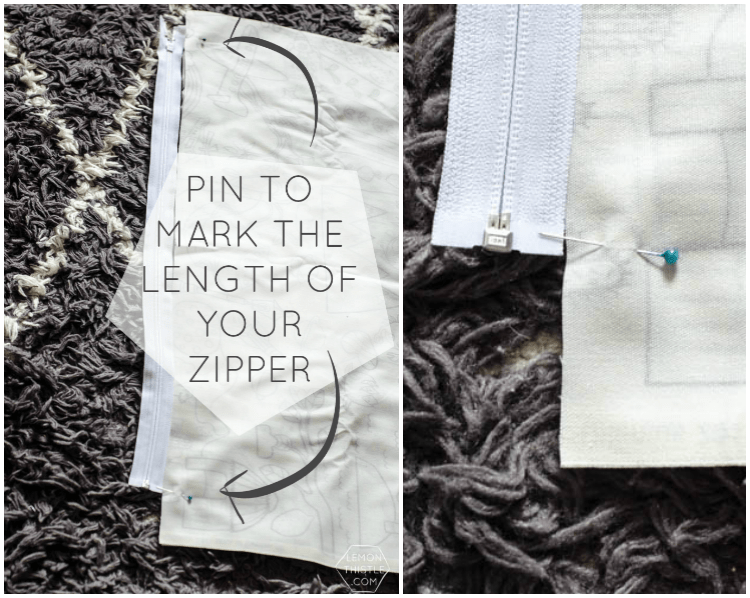
Line the pieces you will be sewing your zipper between (the bottom and one of the edges), right sides together, taking care to line up the edge. Keep in mind this is the bottom of your pouff so if you have a directional print on your material, you want your sides to be right way up. Now, lay your zipper out where you’ll be adding it (centred on the edge) and mark the ends of the zipper with pins. Don’t actually pin the zipper down, we’re just getting ready for it.


Sew from your pin to the edge of the material (on both ends) with a standard stitch, backstitching at both ends to make sure it’s sturdy. Now switch your sewing machine setting to a basting stitch- a really loose stitch that’s easy to remove. It’s just to give you a straight line- on my machine, I increased my stitch width to 5 to get this. Sew with this basting stitch where your zipper will be (make sure to keep a half inch seam allowance). That means sewing from pin to pin.


When you’ve sewn your basting stitch, iron open the back of your seam and place your zipper face down over the seam. pin your zipper in place and head back to your sewing machine. Guys, I followed Corey’s directions and pulled out my zipper foot and was amaaazed how much easier it is to sew a zipper with it (go figure)! Pop your zipper foot on so you can sew much closer to the teeth (the bulky part). Sew as close as you can (make sure you switch back to a regular stitch!) to the teeth on either side, taking care to back stitch at either end. If you’d like more tips on the zipper foot and how to do this, head over to Corey’s tutorial!
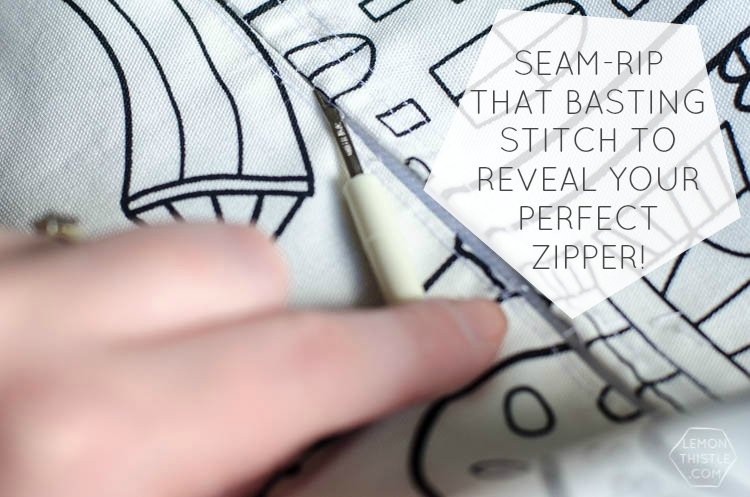

Now for the magic… pull out your seam ripper and rip open that basting seam to reveal a perfectly sewn on zipper! Woohoo! It worked like a charm for me- and on my first try (which doesn’t often happen).


Now back to assembling the rest of your pouff! Pin the rest of your side panels on to the bottom panel. Again, take care to make sure that they are right sides in, with the edges lined up and your pattern is headed in the right direction. Sew these sides on until it looks like the photo above.

Now it’s time to sew those corner edges together! Start by pinning one together, sew it, then pin another. Pinning all of them at once gets messy. See how I lined up my first one to pin and sew above. When you’re done sewing all the corner edges together, you’re ready to put on your top (the last piece!).

This photo is a bit confusing, but I did my best to label it. Just pin it to the tops of your edge pieces, right sides together. I unzipped my zipper before I started sewing to make it easy to turn right way when I was done.


I decided to add handles to mine last minute to make toting it around easier. I ironed the edges under and sewed two strips of material together. Then, I folded those edges under to make double ply at the ends where I attached them to the bean bag. I sewed around the squares of double ply material and then sewed an X through the square to make sure it was secure.


That’s all there is to it! I started and finished this stuffed animal storage pouf in an afternoon, so it doesn’t take long to finish. That’s the beauty of sewing a square- all straight lines! I couldn’t help share another couple photos of my sweet daughter, she was loving this thing when she got home from daycare.

And on the topic of toy storage… I thought I’d share what we do with most of their stuff to contain it. I shared their DIY hanging book baskets in their bedroom- which are still working like a charm. In our living room, we have this vintage egg crate full of books, and a big, soft basket full of their toys. This basket is what my daughter learned to stand on, and it’s easy to toss everything in at the end of the day. I love having pieces that I would have in my house anyways (instead of a jungle themed toy box) in my living room.

What do you do to contain kids clutter? Or any clutter for that matter! Share your secrets with me! And tell me- are you as terrified of sewing zippers as I was? I’ll be back on Friday with your free downloadable tech wallpapers for March!
 DIY Colour Edged Honeycomb Party Balls
I’m so irritated that Bloglovin’ isn’t updating my feed properly because I keep missing out on you fun projects. Thank goodness for Facebook!
But this storage “pouf” is such a great idea! I’m SO not crafty enough to do this project on my own, but I love it! Isla has a crazy amount of stuffies and loves the beanbag chair she has now. One filled with furry friends would be even more fun!
I am working on that Kara! I can’t for the life of me figure out what’s going on- I’ve contacted them for help… fingers crossed we get it figured soon.
This past year (since the babes were born actually) I finally started sewing projects on my own… before that anything involving a sewing machine involved a trip to my grandmas for help :)
This is a brilliant idea for stuffed animals! I cannot sew, but I would probably buy one lol!
Thanks so much Laurel! I’m a novice seamstress at best, but I’m so thankful my grandma taught me the basics growing up. I’m sure you could find something similar online!
First off – Aubrey has done an adorable job of marketing this pouff for you! This is also so innovative, I love that it’s stylish storage with another purpose! Absolutely perfect for a playroom (or living room) :)
Thanks so much sis! I think she’s a pretty darn excellent marketer myself :) And fingers crossed it makes it’s way to the playroom soon!!
I love this idea! I used a hanging hammock between two walls to keep the stuffed animals under control. This would have been so much cooler! Guess I’m making this for a shower present.
Love this idea for storing all of our throw blankets (and we have LOTS!). Thank you for the detailed instructions and pictures – My boys will love this!!
That’s a great idea!