This project is sponsored by Cricut. As always, I never promote a product I don’t love. Find my full disclosure here.

Have you started wrapping holiday gifts yet? I’ve done a few- but I keep seeing friends posting on Facebook that they’ve finished all their gifts. One day I’ll be that person. But that’s not today ;)
BUT I have been having fun wrapping the gifts I have gotten. Today I’m sharing one of those gift wrapping ideas with you! I’ve been in love with the look of raw edge fabric ribbon for quite some time now but that stuff is darn expensive! And cutting fabric is my least favourite part of making fabric anything. Have you tried cutting a long straight skinny line of fabric? Even with a rotary cutter… I struggle. So when Cricut challenged us to come up with a creative way to wrap gifts… I knew I had to try it out! I paired cut fabric ribbon with some DIY snowflake tags and I’m not going to lie- I’m pretty thrilled with how it turned out! Being able to cut fabric with the Cricut Maker is a total game changer.

Oh… and if you DON’T have a Cricut to test this out with… scroll down because there’s a mega awesome giveaway happening ;)

To make your own cut fabric ribbon and snowflake gift tags/wrap, you’ll need:
I’ll link everything to make it really clear what products I’m using!
- Gift wrap, of course
- Coordinating fabric
- Cricut Maker with rotary blade & 12×24 Fabric mat
- Cardstock (I used the blue from here)
- Glitter vinyl
- Standard grip mat
- Weeding tool, Scraper, Spatula & Scissors
- Cricut BrightPad
- StrongGrip transfer tape


Let’s tackle those snowflakes first, shall we? I just used this snowflake file from Design Space Access- you just click ‘Make it’ and it will load the two shapes into your Canvas. SO much easier than designing something myself- which, let’s be honest- at the holidays I don’t have time for that. Copy and paste as many as you want or can fit on one mat and hit GO! I used cardstock for the backing and glitter vinyl for the design. You could totally use cardstock for both and stick them together, but I’d never tried glitter vinyl and had a roll that coordinated really well. I’m kind of loving the gunmetal color of the black glitter vinyl.


Since I’ve never used the glitter vinyl before- I never realized how difficult it is to see the cut lines! I pulled out my Cricut BrightPad to weed them- I would have for sure given up without it. I also learned that standard transfer tape doesn’t work perfectly on the glitter surface- it doesn’t hold the glitter vinyl the same way it does the traditional vinyl. It still works- but is more tedious. I would definitely try the StrongGrip Transfer Tape if I were using glitter vinyl again.


Now for the fabric ribbon! I just used rectangles and stretched them as long as they would cut on the mat. These shapes are preloaded into Design Space so cost nothing. I tried two different types of fabric. I imagine a linen would be totally beautiful as well. I found this wide fabric ‘ribbon’ from Michaels which was rad because not only was it on sale for a deal, it was already the perfect width so I didn’t have to cut it down for the mat. Because cutting fabric is the worst part for me ;)
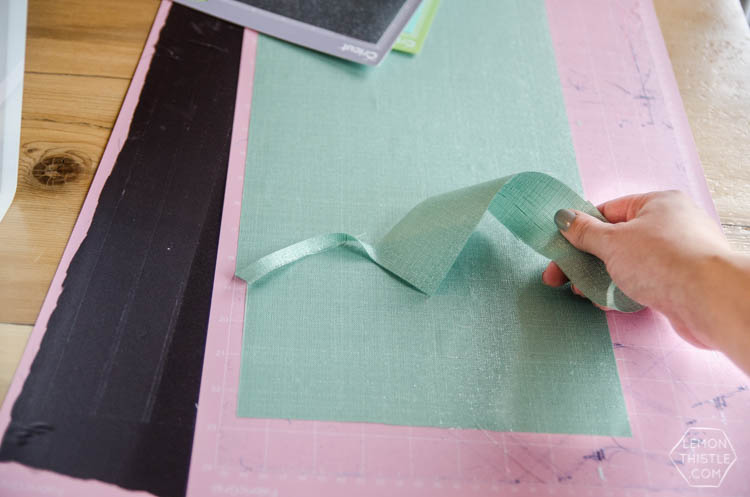
Try get it as straight as you can with the mat- this will help minimize fraying. I used a 12×24 fabric mat to get the ribbon as long as possible. Load it into your machine with the rotary blade and watch it do it’s magic! It will look like nothing has cut until you start peeling back the excess after the cut is done. The shinier fabric, you could see the cuts more clearly.


When they’re all cut… it’s time to get wrapping! For the larger packages, I taped two pieces against the back of the parcel to create one longer piece of ribbon. I’m so in love with how these turned out! They add such a nice texture to wrapping paper and a handmade feel.
Want to win a Cricut of your own to test this out?! Enter below!
a Rafflecopter giveaway
Tell me- what are some of your favourite ways to wrap gifts at Christmas for a handmade touch?
LIKE IT? PIN IT!

This is a sponsored conversation written by me on behalf of Cricut. The opinions and text are all mine.

 Holiday Shared Kids Room- Hello Holiday
Leave a Reply