
Learn how to easily create a digital design board to help you visualize your room makeover ideas and confidently make decisions as you take on your interior home makeover! A step-by-step design board tutorial for even the most beginners.

A digital design board is so helpful in the interior design process. It helps you to decide on furniture or finishes as well as inform any smaller decor choices as you go about your shopping.
I love the tactile process of making physical design boards (see my tutorial for that here), but when it comes to getting a visual representation of ideas you have for a space? And getting exact furniture represented in that? A digital design board is the way to go.
This is all part of having a solid plan for your room makeover. This is something I talk about a ton here on Lemon Thistle. Like… I harp on it.
But for good reason!
Digital design mood boards are just one part of that plan. They will help you get from your before to the after you’re dreaming of without too many mis-steps.

There’s also a budget (steal my room makeover budget spreadsheet here!) and timeline and alll that good stuff, but today?
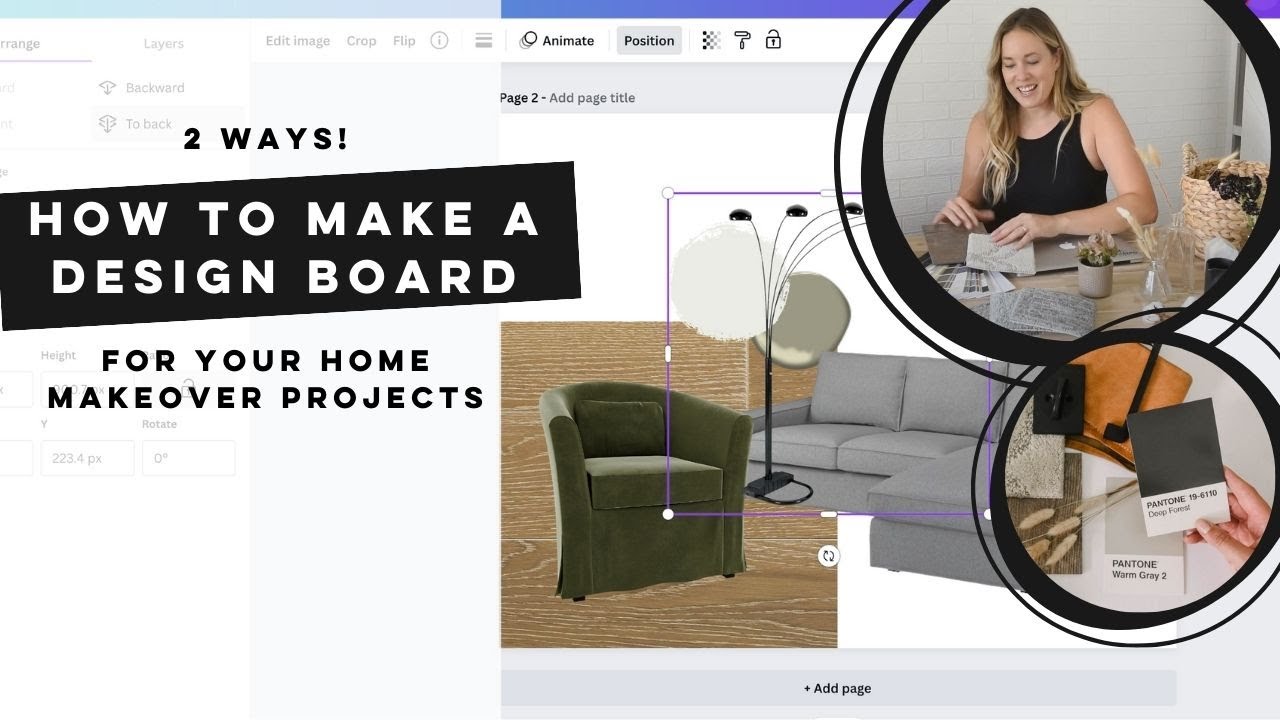
Today I’m going to show you how to create your own design board in Canva so you can get designing your room and making decisions with a working digital design board for your room makeover.
I’ve shared this entire process in a video if that’s easier for you- I’ve included that down near the bottom of that post and here on YouTube.
Consider this blog post your step-by-step guide to creating your own virtual design board for your room makeover planning- without any fancy software or design training.
Yeah, this is totally doable for YOU, for a beginner, and for… well, anyone. It’s totally doable.
So let’s get that inspiration off of your pinterest board and to some actual plans with your own interior design mood board to help you make decisions for your home projects with confidence.


Can I make a digital design board for free
There are so many different design programs that you can use for this. In this tutorial I’ll be using Canva to make a digital design board.
I used to do this in Photoshop almost exclusively for this since it gave me the option to remove backgrounds from images. Before I learned Photoshop, I’d use Microsoft Powerpoint to do this sort of thing (don’t knock it, it’s actually super great for basic design!).
Now, I use Canva for my own design boards as well 95% of the time. It allows me to do almost everything that I would do in Photoshop for design boards but quicker and without slowing my computer.
If you’re not a proficient photoshop user, Canva is also SO much more user friendly for beginners. Even my kids love to use this online design tool. You really do not need to have any graphic design skills to use this.
Canva is free for most designing purposes, but there are features that I use that are in their paid version. For the most part, you can do this with a free account, but you might want to try out the pro account- they do have a free trial.
The one thing you’ll really want to do that the free version doesn’t support is removing backgrounds.

If you see design boards where the furniture is spaced out from the flooring which is spaced out from the decor items, it’s likely that the backgrounds were not removed from those images.
This will look a little more like a collage of images or a collection of images instead of a mockup showing how your actual room might look.
You can see an example of this above, you’ll often see this as a curated shopping list type of download from designers. In this dining room design board, I didn’t remove any backgrounds, just cropped the images down to fit nicely beside each other. All of these furniture pieces are from Article.com.

Alternately, you can create design boards without removing backgrounds. Here’s a design board I’ve created that just uses images cropped so could be created with the free version of Canva.
This is more of a collage style design board and can be very helpful for deciding a direction and a style for your space but might not be as helpful when it comes to picking specific furnishings or details for your space.
This type of design is good if you can’t find images with solid white backgrounds like in the first example.
This particular design board is part of my design board templates pack if you’re interested in a head start!

How to save images from websites for design boards
As we make our digital design board, we’re going to pull in images of the design elements, products, paint colors, and finishes that we want to use in the space and start compiling them into a new Canva design.
Before we do that, the first step is to save those images you want to incorporate.
I like to include the actual products I will be using whenever possible to get a good example of what your room will look like with all the finishes.
If you’re doing your design board as a kind of starting point dream board, say for a living room… you can pull in any furniture you find to help you decide on a direction and then as you set your budget and start shopping for specific pieces, you can replace those pieces with the actual ones you choose.
Having it designed gives you a general idea of what looks good then you can just swap those images into makes it easy to see what each piece of furniture would look like with the others. I always like to do this when I’m deciding between furniture- you can see I do that in the video where we’re planning my sister’s room makeover.
You can get these photos from online listings of products you’re planning to buy or by taking pictures in store but if you can grab images of the product with a plain white background that will make things a bit easier.
Since the white backgrounds are so much easier, I’ll often just grab photos of the furniture that I have from their listing online instead of taking the photo in my house and worry about cleaning it up to take a photo.
Some websites will let you right click and save the image, then you can upload it to Canva under the ‘uploads’ tab. You can also just copy the image from the website listing and paste it into Canva. I will often do this Just from Google Images. Although, some websites will block both of these actions.
If so, you can screenshot the image of the finish or product you’re wanting to include.
On Mac, the shortcut to screenshot is command/shift/4 and you can drag your mouse to select the area you’d like to capture. On PC, the shortcut is the Windows logo key/Shift/S. Typically saved images will go to your downloads folder and screen shots will go to your desktop. On Mac if you drag the image preview of the screenshot from the right lower corner of your screen to your Canva design before it disappears, it won’t save to your desktop.

What should you include in a digital design board
There are so many things that you can include in a digital design board for your room makeover. Here’s a general list to get you started. While this with vary from tiny bathroom to master bedroom, there’s some things that you definitely want to have in there regardless of the space.
- wall color (and trim if it’s a standout!)
- flooring
- wall applications (wallpaper or moulding)
- lighting
- large furniture
- small furniture
- appliances
- large fixtures for features

I also like to add in details to really bring the design to life. It’s the same as styling a room. It will absolutely look flat until you add some texture and decor elements.
- plants
- fabric details (pillows, curtains, rugs etc)
- wall art
- decor items where possible (something on that coffee table!)
- If your room is a non-decor space, include hardware like cabinet pulls
If you’re looking for more tips to make a room makeover come to life, help it feel cozy or general room makeover tips, check this resource out!

What order do I put pieces into my interior design plan?
You can really add items in any order and then play with the positioning (ex. bring to front). That said, I like to follow the same sort of process as I pull mine together.
- I start with my must incorporate features first, the things that will NOT change
- Next up is deal breakers. If these are in the space, it’ll be a win (grandmas hutch, clawfoot tub, that new sofa you’ve already ordered)
- Now the big pieces if they weren’t one of those top two things: flooring, large fixtures
- Your feature, the thing that will be the star of the show (ex. an accent wall, a bold piece of furniture, blue kitchen cabinets etc)
- Wall Color
- Large Furniture + Rugs
- Small furniture
- Lighting
- Wall Decor, accents, throw pillows, plants etc.

Place your Must Incorporate Features First
First thing we pull in is the things we NEED to incorporate. These are the things that you wont be changing. This could be your old wood floors that you love or that you aren’t budgeting to change. This could be your clawfoot tub that someone would have to pry out of your cold fingers. I used the original claw foot tub from our Tux House Bathroom and that was the MUST in that design, everything started from that (above).
It could be the fireplace that you don’t love but aren’t able to change because you’re renting. Just because you don’t LOVE it, doesn’t mean it shouldn’t be in there.
For example… if you don’t LOVE the tan carpet, you still need to live with it. Pretending it doesn’t exist in your design board might feel good in the moment, but keep in mind different tones and finishes play differently together. One paint color might make that floor look realllly brown. And another might make it way less noticeable. And those two colors? You might like them equally. So why not choose the one that downplays it?
You can see in the design board below, the homeowner I worked with had carpet. She also had the furniture in this design board. It was a relatively new purchase and she wanted to work with it while giving the room a whole new look. We didn’t ignore it, we added it in to make sure everything played together.

How to add your own flooring to a design board
Sometimes you’ll be able to easily find images of these keepers online but oftentimes, they’re older or can’t be found exactly. Instead of spending time searching up the exact flooring you have, just take a photo of your floor and add that to your design first. I have done that in almost all of my design boards where I’m reusing furniture or flooring.
I worked with a reader on this space above. This is her own bedroom furniture we were incorporating in the space, and her own flooring. She just sent me a photo of her bedroom and we worked with the images, removing backgrounds and using the magic eraser tool (I share how to do that in detail below!).
Next I’ll pull in deal breakers, things you really want to incorporate or that you have already decided on.
If the Image doesn’t have a background, you’ll get to just drop it into place, size it by pulling the corner dots when the image is selected and place it how you like.

How to remove a white background on a product image for a design board
If your image has a background, we have one more step. This is the top feature that I’ll be sharing from Canva that is not available in free accounts. They do have a free trial of the Canva Pro account, so I’d check that out if you’re planning to make design boards- this really makes it so simple and is affordable too!
Once you’ve placed an image on your Canva design board, you can click ‘edit photo’ from the top options bar and then ‘background remover’ from the left hand panel. When I’d recorded the video, this option in the top bar was called ‘effects’.
This will think for a second and then remove the background for you. If there was another item in the photo, you might need to erase a bit more or you might need to restore a bit that’s been erased, and it does give you the option for that before you accept the background removal by hitting ‘apply’.

How to crop out a piece of an uploaded image in a Canva design
Sometimes you don’t need to erase a background on your image but you do want to erase a logo, crop out a hand or your shoe out of the flooring photo you took. There’s two easy ways to do this in Canva without touching that background remover tool.
The first way is by far the simplest. If the section you’d like to crop out is to the side, top or bottom, you can crop the image by dragging the edge lines when the image is selected.
The corner dots are for sizing it, but there’s white small lines on the sides of the image that will let you crop it down. Whenever I can, i just use this tool as it doesn’t need to process. That’s what I did with this rug, I just sized down the image to remove the white background.
You can also erase parts of the image using the Magic Eraser tool, also found under Edit Photo. It’s very simple to use, you just brush over the parts of the image you’d like to erase. You can change the size of the brush and I like to zoom right in to make sure I’m getting just the bits I’m aiming for.

How to add paint colors to your design board in Canva
The next step is to add in the paint colors that you’re planning to use on your interior design project. Sometimes you just have one wall color and other times you’ll have color schemes you’re working with- especially if it’s a larger space or you have furniture you’ll be painting.
There’s a couple different ways to do this. The quickest is to just change the background color of your design by clicking on the white background and picking a color.
You could also just add a rectangle and change the color the same way. But my favourite way is to get a paint splotch graphic and throw it in there. There are graphics in Canva if you search for ‘paint splotch’ that you can recolor easily. You’ll know if you can recolor it if a little color block shows up in the top bar when the image is selected.

Sometimes I like to pull in a full color palette that doesn’t just reflect paint colors but any other decorative accents you’d like to include. You can see that I’ve done this above with the aesthetics space I worked with a consult client on. I used blanket textures for the color palette, but you could just do solid circles of color should you prefer.
You could then use that design board to help pick out throw blankets, decorative objects and even art that pulls from that color palette. You can see I’ve done that here with this business space design board I created.
Since she wasn’t adding much furniture, the design was all about adding texture, warmth, and interest to a clinical space. The color palette influenced everything we added.

How do you get the paint color to actually match the exact shade you want?
Okay I know that I want a green, but picking a random green out of the color options in Canva isn’t helpful. I want to see the exact paint colors I’m considering with my furniture to see if it will look great and to make it look more realistic. You got it!
I like to search up the exact paint color on Google Images. If you’re lucky, there will be a beautiful paint splotch or swatch or dollop that you can grab just like your furniture.
You can see that the Benjamin Moore website offers this as an option to download for every single one of their paint colors but most websites don’t offer that.


You can add that paint dollop right in with a transparent background and layer as many as you like to easily create a color palette for your room makeover.
These are quite small so if you’re wanting to size it up and make it a major element of your design board, you might prefer to try this next method instead!


No problem if there’s no paint dollop available! If this isn’t an option, I’ll just copy the rectangle color sample from the paint brand’s website and paste it in. I then add a shape that looks similar to a dollop or sometimes just a plain circle. You could even skip the element and just use the whole background of the design.
Then you can use the color dropper tool (custom color) when you have selected the background or element you’d like to recolor. When you get that little eye dropper tool, just select that sample you’ve pasted in.
You can delete the sample from your mood board after that and your colored element will stay! Exactly like the paint color you’re planning. Easy, peasy.

How to get your decor accents to look more realistic in your design board
Sometimes removing the background isn’t quite enough. The scale is off or it just looks funny. Here’s some tips to help polish your design board up a little bit.
Play with the angles. If you’re finding it looks choppy and not lively, you can tilt that rug, stagger the things that would be on the floor, move the light to one side and have the art up higher on the other. It isn’t going to look exactly like the room, the goal here is to get all of the finishes on one page to see how they play together Not to recreate a digital version of your space.
Flip it! If you’re finding all the furniture is facing the same way or something feels backwards, try using the mirror function. It’s called ‘flip’ in the top tool bar when your image is selected.

Another tool I like to use is ‘erase’.
I like to use the erase tool to help things look layered. So if a throw blanket sticks out over the edge of the bed and it really would flop over the end, just erase the part that would flop over, be a little organic in that line and it’ll look so much more realistic. You can see I’ve done that in this design board below.
I wanted to include this one (below) because this was done quite a while ago now. I wasn’t great at it. And it still gives an awesome picture of what things might look like all pulled together. It doesn’t need to be *perfect* to help you visualize a space.

Add more decor! Sometimes if it feels like it’s missing something… it is!
In my Cozy Modern Home Style blog post, I share the different elements I always try to add to a space. From natural tones like baskets and wood to texture with throw blankets and pillows and curtains to plants or fresh flowers.
Any of those items will help bring your design board to life.
Put some books on that empty coffee table, add a plant behind the sofa or add curtains to help balance the light fixture on one side of the design board.

I love a somewhat minimalistic home but your design board does need a little somethin’ somethin’ so here, more might just be more. You can see in this design board I worked with a consult client on, we added more decor than I did for my own home boards where I was just trying to pick paint color.
If you’re craving more interest but nervous about a bold rug, this is a really great strategy. If you’re worried white paint will be too boring, this is a really fun way to add more decor and see how it adds interest.
Just like in a room, if the decor is falling flat, it’s usually the same things missing. plants, natural textures, art and pattern can all help so much! See more here.

How do I include an inspiration photograph in my design board
Let’s consider this a bonus tip ;) Okay so you’ve collected images from all over that are reflective of the vibe or style you want to recreate in your own room. If you’re finding the design board is missing the ‘vibe’ piece, you can definitely include a photograph.
Another time you might want to do this is if you have a space that’s technically ‘finished’ or has pieces you want to sue and just to update, you can include a photo of the space and then overlay the changes you’d like to make.
Here’s a few ways I’ve done this. Sometimes I use the photo as the main focal point, other times it’s there with a slight frame (just layered over a rectangle) to help it stand alone.
Above, I’ve included a photo of my dining room- it has the floors, the wall color and the table and chairs I’ll be using… but no decor. I added all the decor in to the design board.

Here I’ve included a photo of my living room with the furniture I’d like to layer in. It’s super simple but helps me see that the furniture I’m thinking of will definitely match the aesthetic of my current space.
With a large purchase, it’s nice to be able to visualize if it will work well and feel coordinated before committing.
Below I used a photo of the space I was inspired by (in this case, it’s my own design that I was recreating for a home show), but you can see how it helps inform the feeling of the design board. I’ve just added a border around it to help it feel intentional and not just an afterthought.

As always, be mindful of image copyright. If this is just for your own use, it’s totally cool to use photographs to help create a design board.
If you’ll be using it for social media graphics, client presentations or in any way to make money, the rules change. Don’t use images you don’t have rights to!
Always give credit, even with permission to use the images.

Grab the cheat Sheet to making a design board easily
If you’d like to have a handy check list style cheat sheet to help you as you make your first design board, I’ve got the nuts and bolts of this post condensed down into a printable PDF for you as well!
Here you can see both how I make a tactile design board and how I make a simple digital design board in Canva like we’ve talked about in this post! If you’re a visual person it might be helpful for you to see it in video form. If you are- make sure you subscribe so you don’t miss new videos!
If you’re looking for even more support as you plan your room makeover, I also have a full course that walks you through step-by-step planning your room makeover for success. If you don’t know where to start, don’t know what style you even like, how to create a budget… this covers it all. You can find more about that right here!

Design Board Templates to get Started With
If you’re just wanting to take on a design board and want a bit of a head start, I have a pack of templates that you can purchase and use within Canva right here.
These are drag and drop templates for most of the spaces in your home, just drag and drop your images into the template to swap them out!
Happy designing!
Pin this for later!
Don’t have time to take on a design board right now? Planning to make over your space later this year? Pin this so you can come back to it! Plus, pinning or sharing on FB helps this post reach more people which helps me be able to keep sharing with you. Thank you!


 Winter Quotes Printable Word Art for Home Decor
Leave a Reply