• Skip to main content
  • Skip to header left navigation
  • Skip to header right navigation
  • Skip to site footer
  • Shop
  • Courses
    • Course Login
  • Get The Email

  • DIY
    • DIY Home Decor
    • With Power Tools
    • Renovation
    • For Kids
    • For Parties
    • Organization
    • Cricut Crafts
    • DIY Yard Games
  • Home Decor
    • DIY Room Makeover E-Course
    • Room Reveals
    • Kid Friendly Home
    • DIY Home Decor
    • Renovation
    • Shop My Home
  • Lettering
    • Hand Lettered Printables
    • Free Practice Sheets
    • Handlettered DIY
    • Steal My Lettering
    • Free Brush Lettering Quickstart Guide
Lemon Thistle

Lemon Thistle

DIY, Hand Lettering + Home Decor

  • Printables
    • For Cricut
    • Party Printables
    • Home Decor Printables
    • Bachelor Bingo
    • Handlettering Practice Sheets
    • All Free Printables
  • Entertain
    • Party Printables
    • Party DIY
    • Tablescapes
    • Kids Parties
  • Blog

DIY Towel Rack from Free Pallet Wood

Sep 08

Awesome video tutorial! DIY Rustic Towel Rack from Free Pallet Wood

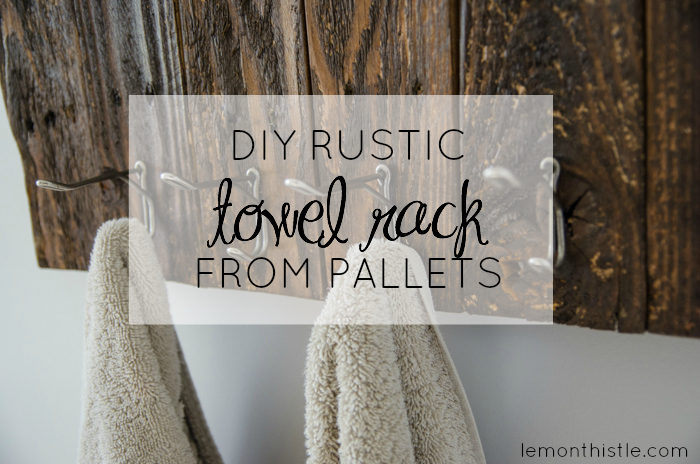
Happy Monday! Today I’m sharing how to make a rustic looking towel rack using the pallet wood I showed you how to disassemble last week! I’m really excited about this one- I love the way it turned out. Before I made this, we were hanging our towels over the shower curtain rod (seriously). So not fun. This is my last DIY Video with Shaw TV for a few weeks while we prepare some more for you. That’s right. We’re doing more! So thank you for all the positive feedback and convincing them to have me back. You guys rock :)

YouTube video

You’ll Need:

  • Pallet Wood
  • 60 Grit Sandpaper
  • Saw (circular saw, chop saw, hand saw all work)
  • Stain, a rag to apply, and gloves
  • Clear Coat
  • Power Drill and 1 Inch Screws (or longer, depending how thick your wood is)
  • Hooks

DIY Rustic Towel Rack from Free Pallet Wood

Great detailed how to video- DIY Rustic Towel Rack from Free Pallet Wood

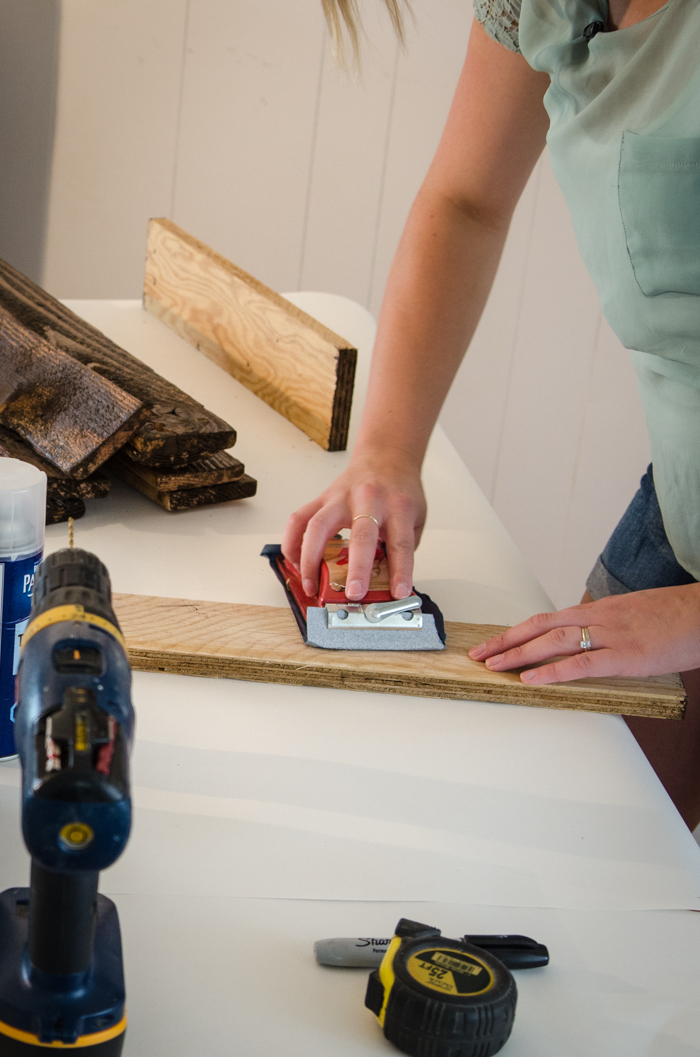
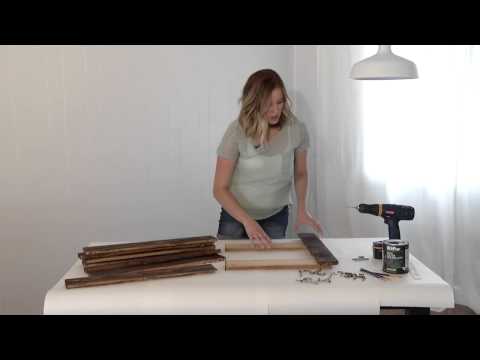
Decide how big you want your towel rack to be (I used washi tape to mark it out on our wall) and cut your pieces to length. You can use a circular saw, chop saw, or hand saw for this. You’ll also want to cut two pieces of backing that will be two inches shorter than your towel rack is wide. Then, give your pieces a light sanding to get rid of all the really rough spots, but not so much that you lose the rustic quality of the wood.

Great detailed tutorial! DIY Rustic Towel Rack from Free Pallet Wood

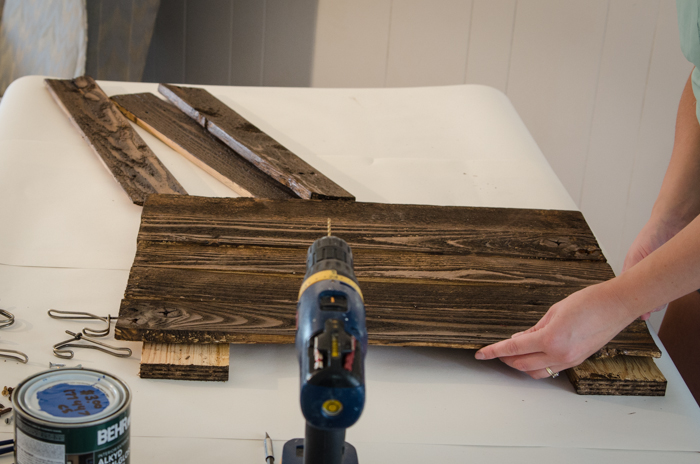
Now give it a coat of stain and then a coat of clear coat. I didn’t take pictures of these steps, but I’m sure you are super smart and can figure it out ;) Once it’s all dry, try laying out the pieces of your towel rack to get the look you like. Then you can flip it over and start screwing it together.

Great detailed video tutorial! DIY Rustic Towel Rack from Free Pallet Wood

DIY Rustic Towel Rack from Free Pallet Wood

DIY Rustic Towel Rack from Free Pallet Wood

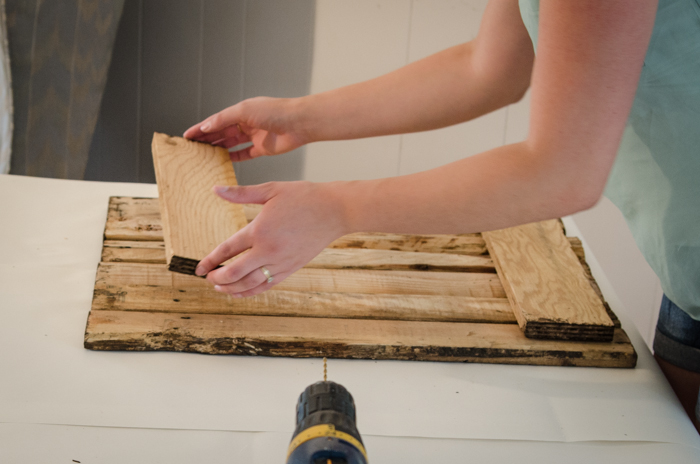
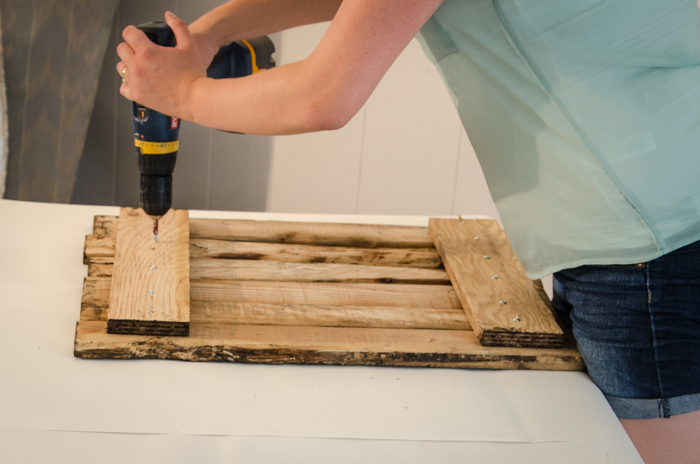
Screw through the backing, the screws will just get into the pallet pieces enough to hold them in place, but not all the way through so you don’t see the screws. Oh, and you won’t see this last shot in the video… I’m super prepared and didn’t realize my backing pieces were the tiniest bit thicker than the rest of the pallet wood. So mid filming we had to stop and sort through my bucket of miscellaneous screws to find some that were a quarter inch longer. Embarrassing, right? Anyways… next step.

Awesome video tutorial! Totally do-able. DIY Rustic Towel Rack from Free Pallet Wood

DIY Rustic Towel Rack from Free Pallet Wood

Great detailed tutorial! DIY Rustic Towel Rack from Free Pallet Wood

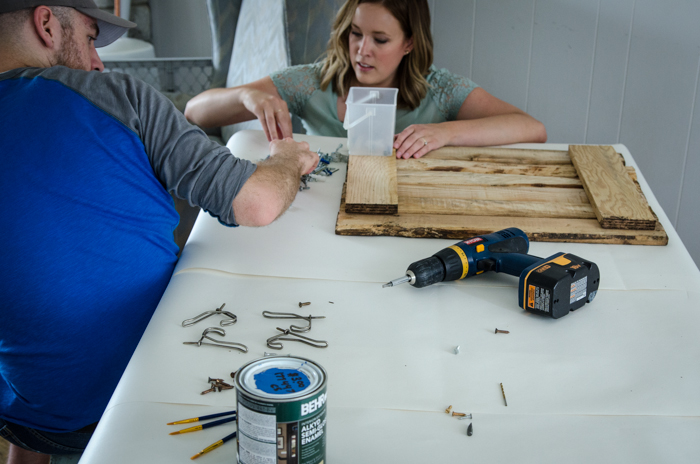
You’re pretty much assembled… now just for the hooks! I used antique hooks (I love ’em!) and since they’re cast with the screws in them, I drilled pilot holes before hand screwing my hooks in. If I had standard hooks, I would have just screwed them in with a drill.

Super detailed video tutorial! Love it. DIY Rustic Towel Rack from Free Pallet Wood

This tutorial is super detaied- awesome.DIY Rustic Towel Rack from Free Pallet Wood

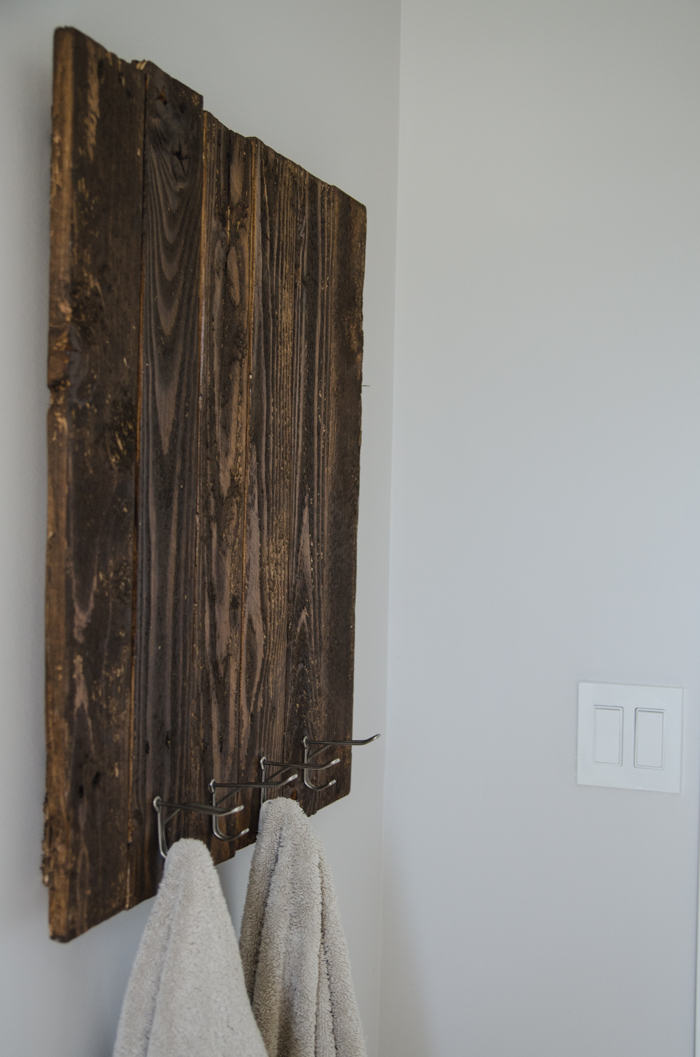
So that’s it, guys! I hope you like it as much as I do. If you want you could paint something on the top half- or add a picture frame or something clever like that. I planned on painting ‘squeaky clean’ on mine, but I decided I loved it without. What do you guys think!? Would you paint a saying on it, or leave it as is?

Oh, and if you missed the rest in the video series check them out here! DIY  Confetti Wreath / DIY Driftwood Garland / How I Disassemble a Pallet

  • Facebook
  • Twitter
  • LinkedIn
Category: DIY, Home DecorTag: Bathroom, Budget, DIY Home Decor, Pallet, Rustic, Video, Wall Decor, Wood
Previous Post:Love this list! Autumn To Do List - Lemonthistle.comAutumn To Do List: A Free Printable
Next Post:DIY Translucent Confetti PacketsSO CUTE! DIY Translucent Confetti Packets - lemonthistle.com
Avatar photo

About Colleen Pastoor

Colleen is the DIY blogger and author behind Lemon Thistle blog where she shares hands on DIY tutorials, home renovations, hand lettered designs, and projects to simplify your life… beautifully.
If you enjoy modern home decor (that’s totally cozy for your family!), saving money through DIY and simplified lifestyle- you’ll love the tutorials Colleen shares on LemonThistle.com. Find her @colleenpastoor everywhere else!

Reader Interactions

Comments

  1. Avatar photoErin

    Sep 08 at 8:16 am

    Lovely! Where did you find those hooks?

    Reply
    • Avatar photoColleen Pastoor

      Sep 08 at 11:19 am

      From the Pritchard Antique store… have you been? We’ll have to take you!

      Reply
      • Avatar photoErin

        Sep 12 at 7:01 am

        I have never been. I will put it on my “next time” list.

        Reply
  2. Avatar photoKara

    Sep 08 at 8:28 am

    I love this! I think if I were every to live in a house with no ensuite bathroom, I’d definitely use something like this with multiple hooks instead of towel rods. (Also: Why is it that they only ever hold 2 towels, max? Ridiculous.)

    Reply
    • Avatar photoColleen Pastoor

      Sep 08 at 11:20 am

      We’re trying to make life work without an ensuite (that’s the only thing this house is missing) so more hooks were a must!

      Reply
  3. Avatar photoTheresa @DearCreatives

    Sep 08 at 1:40 pm

    I need two of these at my house! Love how easy it looks to make. Pinning for later. Found you through a hop stop by anytime.

    Reply
    • Avatar photoColleen Pastoor

      Sep 11 at 10:31 am

      Thanks so much Theresa! If you do make them, I’d love to see photos!

      Reply
  4. Avatar photoJenny

    Sep 08 at 3:59 pm

    This will look amazing in my bathroom! I would love for you to share a project on my Meet Up Monday Blog Party!
    http://jennymaire.blogspot.com/

    Reply
    • Avatar photoColleen Pastoor

      Sep 11 at 10:31 am

      Thanks so much Jenny (I hope they do!) I’ll head over and check it out :)

      Reply
  5. Avatar photoJenn @ My Fabuless Life

    Sep 09 at 1:26 pm

    I swear everything you touch turns to AMAZING!! So, so in love with this!!

    Reply
    • Avatar photoColleen Pastoor

      Sep 11 at 10:32 am

      Aw, thanks so much Jenn! You make my day :)

      Reply
  6. Avatar photoKatherines Corner

    Sep 09 at 2:20 pm

    It looks terrific it gives a wonderful rustic vibe. Love it. Hugs!

    Reply
    • Avatar photoColleen Pastoor

      Sep 11 at 10:33 am

      Thanks Katherines! I have a whole rustic industrial idea for our bathroom when we FINALLY get around to doing it… so this is the first :)

      Reply
  7. Avatar photolinda

    Sep 09 at 5:24 pm

    Sweet! I like the towel rack without any extras. Linda

    Reply
    • Avatar photoColleen Pastoor

      Sep 11 at 10:33 am

      Thanks Linda! Me too, I’m so glad I decided against painting it!

      Reply
  8. Avatar photoBreanna

    Sep 10 at 8:03 am

    I love this so much!! I think I need one :) Thanks for linking up to Your Designs This Time :)

    Reply
    • Avatar photoColleen Pastoor

      Sep 11 at 10:34 am

      Thanks so much Breanna (I’m so excited you’re here!)

      Reply
  9. Avatar photojennifer prod

    Sep 11 at 2:09 pm

    this look so, so great colleen! and your tv presence is awesome – you’re a natural!

    Reply
    • Avatar photoColleen Pastoor

      Sep 15 at 9:40 pm

      Ah thanks girl! I’m pretty happy with it, we did the four I’ve got up in one day. I’m hoping our next go I’ll be able to work out some of my awkward :)

      Reply
  10. Avatar photoSarah @ Pretty Simple Ideas

    Sep 12 at 8:01 am

    I love beautiful AND practical and this is just that. Thanks for sharing!

    Reply
    • Avatar photoColleen Pastoor

      Sep 15 at 9:40 pm

      Thanks so much Sarah! That’s the winning combo :)

      Reply
  11. Avatar photoMegan

    Sep 13 at 6:54 pm

    I love the way this turned out! It’s so practical, and I like the simple rustic look! Love these little videos too!

    Reply
    • Avatar photoColleen Pastoor

      Sep 15 at 9:41 pm

      Thanks so much Megan! We’re loving how practical it is for sure :)

      Reply
  12. Avatar photoKatie @ Upcycled Treasures

    Sep 14 at 7:45 pm

    LOVE this! That wood and those antique hooks are the perfect combo. Pinned!

    Reply
    • Avatar photoColleen Pastoor

      Sep 15 at 9:42 pm

      Thanks so much Katie! Those hooks make it I think :)

      Reply
  13. Avatar photodaina guild

    Sep 16 at 8:01 am

    Great idea for using in our home gym.

    Reply
  14. Avatar photoLaura Irion // Avery Street Design

    Dec 13 at 5:57 pm

    We’ve already discussed how much you amaze me (are you scared I’m stalking you yet?!) so I won’t go on about this…but it’s awesome. xo! Laura

    Reply
    • Avatar photoColleen Pastoor

      Dec 15 at 12:01 am

      Haha! You’re so sweet Laura, I really appreciate all your support! I love your style too- we were made to be blog friends ;)

      Reply
  15. Avatar photoJessica

    Feb 02 at 1:07 pm

    So, how did you hang it on the wall?

    Reply
    • Avatar photoColleen Pastoor

      Jun 17 at 10:14 am

      I used large screws (2 and rested the backing board on them. The screw heads are large enough that they tuck behind the edge and keep it sturdy. Another option would have been to nail in hanging hardware :)

      Reply
  16. Avatar photoLindsay

    Sep 17 at 5:45 pm

    Hello i jad to make one after seeing this. Was curious what you used to hang it on the wall? Thank you in advance for tips :)

    Reply
    • Avatar photoColleen Pastoor

      Sep 23 at 10:29 am

      I think I spotted that on Instagram but CANNOT find the post anymore! Can you hashtag #lemonthistle or send me your username so I can track it down?

      I sunk screws straight into studs, they have large heads and the backing rests right on top, it’s darn sturdy even with littles pulling towels off it several times a day.

      Reply
  17. Avatar photoROSEMARY

    Sep 27 at 2:36 am

    I absolutely love this DIY towel rack project! Using pallet wood to create functional and stylish home decor is such a brilliant idea. Not only does it add a rustic charm to your bathroom, but it’s also an eco-friendly way to repurpose materials.

    Reply

Leave a Reply Cancel reply

Your email address will not be published. Required fields are marked *

Sidebar

2025 free printable calendars are here- text over image of 5 free printable calendar formats printed


Thanks for dropping by!
I’m Colleen: wife; mom to 4 wild ones; and DIY blogger behind Lemon Thistle. You can expect to see affordable DIY, cozy modern home decor, renovations, free printables, hand lettering and the occasional party on Lemon Thistle. Read More…

WOOHOO!

Check your email to confirm!

(+ get your freebies + discounts)

email facebook youtube instagram pinterest

Search

Copyright

Unless otherwise noted, all content and images are mine. Full posts may not be shared without express written consent. But I love when you share!

Feel free to share, without altering, one image with proper credit and a link to the original post. All free printables are for personal use only.

Legal

Everyone loves proper credit- if you ever notice something improperly credited, please please shoot me an email and I’ll fix it lightning fast.

Find all my policies right here.
This includes my privacy policy, info on the GDRP compliance, and information on affiliate links (Including Amazon Affiliates).

Copyright © 2025 · Lemon Thistle · All Rights Reserved · Powered by Mai Theme